There are countless items that you interact with on a daily basis that are either the result of metal stamping or consist of parts created with metal stamping. Just on a quick look around your room, you might be surprised by a count of which items have a direct connection to metal stamping. Your fire extinguisher trigger, the cover to your light switch, the frame to the exit sign, the staple remover in supplies cup, even that cup itself; all products of the metal stamping industry. But how do they get it from a piece of sheet metal to the product in front of you? Below you can see a video of just some of the steps that go into creating a custom piece with metal stamping.
What does the rest of the process look like? Continue reading below to see how Charles Richter can turn an idea into a physical piece.
Step 1- Engineering
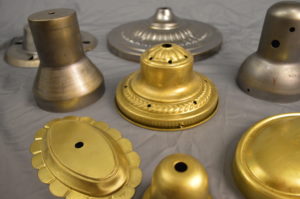 The entire process begins when highly trained metalworkers develop various shapes and objects. These shapes can include domes, cones, half spheres, squares, eyeballs, or ovals, to name a few. The image to the right shows some of these unique shapes. Once they’ve developed these shapes and objects, they use them to make the dies that will form the metal. This is done by utilizing specialty tools to turn raw metal material into unique metal objects.
Step 2- Metal Stamping Plan
Now, with an approved product drawing and die created, the process is passed onto the metal stamping team. Here, the staff works to evaluate the product drawings and will determine which metal stamping process and equipment to use. Some of the possible processes could include bending, coining, drawing, and stamping, to name a few. For some, more complex products, there will be a need for multiple processes and equipment to be used.
Step 3- Custom Metal Stamping
With a drawing, die, and plan in place- the metal stamping process is executed. Again, what tools and unique steps are required depends on what product is being stamped and other factors such as material, production size, and any finishing requests.
Step 4- Assembly
By this point, depending on the complexity of the product being produced, there may be a need for assembly. For that, a metal product can be introduced to multiple options, including binding, welding, or bending. The requirements or process for any of these depends on the metal product being assembled. It is important, after assembly, that the products are thoroughly inspected for accuracy before they are completed.
Step 5- Finishing
Once the actual metal stamping and any required assembly has been done, it’s time for the product to enter the final stages, which is also known as the machining process. Since this is where a metal stamping product takes its final form, this is also the most important step. During this step, a number of metal stamping tools and processes are used to accomplish any remaining requirements. These can include boring, turning, tapping, drilling, sawing, milling, or grinding. Following this, sandblasting usually occurs once the product cools. Then, if desired, any painting, sealing, or priming would take place. The product is then inspected one last time before being distributed.
While these are the five basic steps you will find when it comes to custom metal stamping, the keyword is custom. There are many options afforded to you before, during, and after the metal stamping process that helps guarantee you end up with the part, or parts, you were looking for. Are you looking for a custom stamped piece and unsure what its production would look like or what finishing it would need? Contact Charles Richter’s expert metal workers today and they can help walk you through the process.